Building a reactive calculator with Keera Hails (3/5)
In our last post, we saw how to populate a dynamic page in Haskell from static files, and how to access HTML elements from the page, how to make their attributes and events reactive, and how to connect them using reactive rules.
Our goal in this post is to complete the view of our application. We will do so in three steps. First, we will lay out the elements in a web page. Second, we will style them to look like a calculator. Finally, we will make those elements accessible from the rest of the application as reactive values.
Building a Fully Functional GUI
Most simple calculators have a very limited number of elements. They have an area showing the current calculation, which we already created in the previous post. They also have buttons for the numbers, some numeric operations (addition, subtraction, etc.), a button to calculate the result, and buttons to clear the current count. Most calculators would have a button for the decimal point, and some would also have memory function (and some can run Doom!). In this series, we will keep things simple and use integer numbers only. We invite you adapt the code to work with decimals and to include other functions.
This step actually consists of HTML editing only. All we want to do is create more elements on the screen, which we lay out in the form of a table. We only need to change data/body.html to the following:
This new HTML file simply adds more elements to the table, one for each button. Notice how we give each element its unique ID: this will help us both style them appropriately and access them from Haskell. Also, notice that we indicate that some cells spawn over several rows or columns (otherwise, they would all occupy the same space), to get the appearance we see in a real calculator or keyboard, where some keys are bigger than others.
If we re-compile and run this example, we should now see the following:
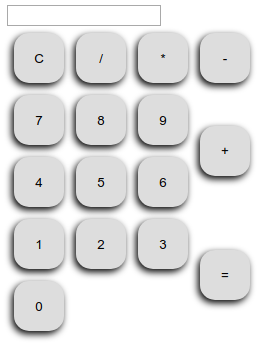
This is a very crude user interface, and will need some work to look like a real calculator. First, we are going to size all elements correctly, and add the proper shapes for the borders. Because all our styles are in one location and all elements have their own IDs and have classes, all we need is to replace data/head.html with the following:
If we now re-compile and run, we should now see a much better looking calculator that is centered on the screen. We are not going to go step by step and explain the styling changes: you are free to look at the diff more carefully and investigate what changed and why.
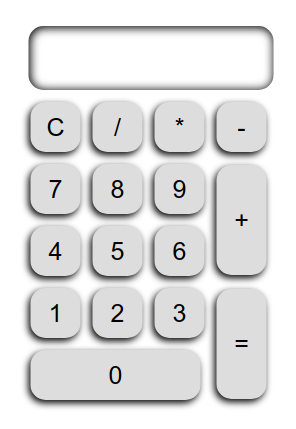
This is already much better, but we are not quite there yet. We want it to look like an actual device. Let’s add some border with an additional rule in the styling sheet that gives the calculator div a background. Just like the buttons and the text box, we give the div that contains the calculator a border radius that makes the whole user interface uniform.
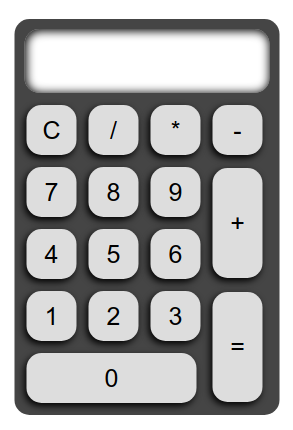
As a final step of user interface design, we will style the user interface to use a better looking palette. A good looking palette can make an immense difference in your design. If you are not familiar with color theory, the easiest way to find a palette is to use palette generators. You will see that some may be nice looking but not work for your calculator, and others may work in isolation but not with the background you choose or the rest of the application. Even when working with professional designers, there’s always a lot of back and forth, so don’t be scared to try different colors and see what works best for your case. For this example, we choose a palette with two characteristics: 1) contrast, which we need so that users see the difference between background and buttons, and 2) based on blue and green, the former suggesting robustness and stability, and the latter indicating that it is dynamic:

All we have to do now is alter the style sheet to assign different colors to different elements. You can apply these changes to your head.html, or simply replace it with the following file:
Recompile now and not only will the calculator be more elegant, it will also give the user some feedback regarding the interaction with different buttons:
This is a very good looking calculator!! We will apply some minor style changes in the last post, after we show the result to our client (i.e., our cat) and get some feedback. However, only buttons 1 to 4 actually work at this point. Changing that to get all number buttons from 0 to 9 would require just replacing two numbers in the code. For the operation buttons, we can use Haskell functions as first-class citizens in the RVs. For unary actions, like clearing the state or forcing the current result, we introduce a new types Action:
data Action = Equals | Clear
  deriving Eq
The distinction between binary operations and unary actions is not based on the arity, but on their meaning in our abstract domain. One denotes a mathematical function applied to numbers, and the other denotes a feature of the device (forcing the current calculation or clearing the memory). Some could be implemented as functions on the calculator value (e.g., cleaning is const 0). We invite you to try and implement more advanced calculator functions in the same way and see where the limits of that approach are.
After we capture all elements and associate RVs to each calculator button, our code looks as follows:
Notice that the types of the RVs associated to the actions and operators are,
respectively, ReactiveFieldRead IO Action and ReactiveFieldRead IO (Int -> Int -> Int). That’s right! We use Haskell’s ability to treat functions as
first-class citizens to have RVs that directly pass functions to apply to the
model.
In the next post in this series we will define the full application model, make it reactive, and connect it our reactive GUI elements. You probably have some ideas about how to do it, so, while you wait for the next post, go ahead, try it, and share your result!
You can continue with the next post in this series here.